


This post will outline an extremely simple yet effective Release Pipeline model you can use in your PowerShell projects. This process is essentially a distillation of the whitepaper written by Michael Greene from Microsoft and Steven Muraski from Chef using PowerShell based tools. I highly recommend you read the whitepaper which you can grab at http://aka.ms/thereleasepipelinemodel. The whitepaper gives an excellent overview of the Release Pipeline Model (Source, Build, Test, and Release) and how this simple and easy to understand model can be applied to IT Operations.
STOP!!!
GO READ THE WHITEPAPER BEFORE CONTINUING!!!
CLICK ME
Now that you’ve digested that, here is a quick overview of the various components.
- The Release Pipeline
- Tools we can use with this model
- Installing the tools
- Creating our Script Folder
- Repository Overview
- Testing Failures
- Wrap up
The Release Pipeline
Source
All configuration for a given system and any scripts running in your environment will be stored in Source Control. This is the single source of truth for your environment and ALL configuration, policy, tests, and deployment scripts are stored here as versionable documents. All artifacts will be produced from documents you keep under Source Control.
Build
A build system is an orchestration service that is is connected to the source control platform so that action can be triggered when files change in the source repository. The build server will be responsible for running the build script defined in source control. This build script will perform all the necessary tasks the must occur before a change can be released into production.
Test
Once changes are submitted to source control, the build system will orchestrate the process of running various tests on the code to check for style (linting) and static code analysis (PowerShell Script Analyzer). Unit, Integration, and Acceptance tests can be performed with tools like Pester.
Release
Once the code or configuration changes have passed all tests defined in the Test stage, the code (or artifacts produced from the code) will be
released to the outside world. What Released means to you may vary greatly from project to project. In one project it may mean copying the
tested script to a remote server so a scheduled task can execute it while in another project it may mean building an Azure VM via an ARM template.
Perhaps in another project in may mean deploying a new VM, installing Chef, applying an application via a cookbook, restoring data from a known good
backup and cutting over to the new VM in a blue/green deployment scenario. The point is
that what is Released in your environment has been thoroughly tested and you know the impact the change will have in your environment before you
actually make the change.
Tools we can use with this model
- Source -> git - An open source distributed version control system
- Build -> psake - A build automation tool written in PowerShell
- Test -> Pester - A BDD based test runner for PowerShell
- Test -> PSScriptAnalyzer - A code analysis and linting tool for PowerShell
- Release -> PSDeploy - A PowerShell module to automate deployments using a simple DSL
Installing the tools
Run the following commands to install the various tools we’re going to use. These will either come from Chocolatey or the
PowerShell Gallery. Install-Module is available with PowerShell 5. For PowerShell 3 and 4, you will need
to install the PowerShellGet module from here.
Chocolatey
iex ((new-object net.webclient).DownloadString('https://chocolatey.org/install.ps1'))git and posh-git
choco install git.install
choco install poshgit
psake
Install-Module -Name psakePester
Install-Module -Name PesterScript Analyzer
Install-Module -Name PSScriptAnalyzerPSDeploy
Install-Module -Name PSDeployCreating our Script Folder
Let’s say we have a PowerShell script in use in our production environment. It doesn’t really matter what the script does, but for this example, let’s
say our script is called ServerInfo.ps1. This script will grab some system information from a computer via Get-CimInstance and return it
back to us. We want to start using the Release Pipeline model for source control, development, testing, and ongoing releases of the script.
Release Pipeline Example on GitHub→
Folder Setup
- Create a new folder called
c:\ServerInfo - Create a new file in the folder called
ServerInfo.ps1and place the following contents in it.
ServerInfo.ps1
[cmdletbinding()]
[OutputType([pscustomobject])]
param(
    [parameter(mandatory)]
    [string[]]$ComputerName,

    [PSCredential]
    [System.Management.Automation.CredentialAttribute()]
    $Credential
)

process {
    foreach ($name in $ComputerName) {
        $cimSession = New-CimSession -ComputerName $name -Credential $Credential
        $compSys = Get-CimInstance -CimSession $cimSession -ClassName Win32_Computersystem
        Remove-CimSession $cimSession
        [pscustomobject]@{
            ComputerName = $compSys.Name
            PrimaryOwner = $compSys.PrimaryOwnerName
            RAM = $compSys.TotalPhysicalMemory
            Manufacturer = $compSys.Manufacturer
            Model = $compSys.Model
        }
    }
}
Create a git repository
We need to get this script into source control. Let’s make our folder a source control repository for the script and all associated tests and deployment configuration. This repository is the single source of truth about the script, how it is tested, how it is deployed, and any related documentation.
This is what our folder looks like at this point.
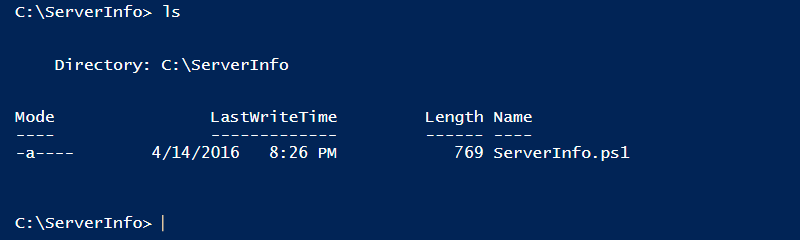
Now that we have git and posh-git installed, let’s make this folder a repository.
cd C:\ServerInfo
git init
Notice that our prompt has changed. This is posh-git showing us that this folder is now a git repository and we already have something to check in.
Create a Pester test script
Create a file called ServerInfo.tests.ps1 in the repository and save it with the following contents.
ServerInfo.tests.ps1
$sut = "$PSScriptRoot\ServerInfo.ps1"

Describe 'Unit Tests' {
    Context 'Parameter Validation' {

        $func = Get-Command -Name $sut

        it 'ComputerName parameter is mandatory' {
            $func.Parameters.ComputerName.Attributes.Mandatory | should be $true
        }

        it 'Returns a [pscustomobject]' {
           $func.OutputType.Type.Name -eq 'PSObject' | should be $true
        }
    }
}
This is a pretty weak test script but that is OK. I’m just describing the process flow. Your set of tests will be much more comprehensive. You can read more about Pester here.
Create a Build Script
We want our entry point into calling various parts of the pipeline to be simple. To do this, we’ll create a small script called build.ps1. Copy
the following contents to the script.
build.ps1
[cmdletbinding()]
param(
    [string[]]$Task = 'default'
)

if (!(Get-Module -Name Pester -ListAvailable)) { Install-Module -Name Pester -Scope CurrentUser }
if (!(Get-Module -Name psake -ListAvailable)) { Install-Module -Name psake -Scope CurrentUser }
if (!(Get-Module -Name PSDeploy -ListAvailable)) { Install-Module -Name PSDeploy -Scope CurrentUser }

Invoke-psake -buildFile "$PSScriptRoot\psakeBuild.ps1" -taskList $Task -Verbose:$VerbosePreference
This build script is only meant as an entry point into calling psakeBuild.ps1 with an optional task to run. We are also assigning the default
psake task to run to Default. This ensures that just running build.ps1 with no arguments will only execute our psake tasks invoked in
testing. You will see that in our psakeBuild.ps1 script below. Your default task should be benign to avoid any unintended actions being taken
by calling build.ps1 with no explicit task.
Create a psake Build Script
The psake script psakeBuild.ps1 is where all the logic for the various tasks over the lifecyle of your script will be defined. Copy the
following contents to the script. There is a simple DSL for psake scripts which you can find more about here.
psakeBuild.ps1
properties {
    $script = "$PSScriptRoot\ServerInfo.ps1"
}

task default -depends Analyze, Test

task Analyze {
    $saResults = Invoke-ScriptAnalyzer -Path $script -Severity @('Error', 'Warning') -Recurse -Verbose:$false
    if ($saResults) {
        $saResults | Format-Table
        Write-Error -Message 'One or more Script Analyzer errors/warnings where found. Build cannot continue!'
    }
}

task Test {
    $testResults = Invoke-Pester -Path $PSScriptRoot -PassThru
    if ($testResults.FailedCount -gt 0) {
        $testResults | Format-List
        Write-Error -Message 'One or more Pester tests failed. Build cannot continue!'
    }
}

task Deploy -depends Analyze, Test {
    Invoke-PSDeploy -Path '.\ServerInfo.psdeploy.ps1' -Force -Verbose:$VerbosePreference
}
You’ll notice we have defined tasks inside psakeBuild.ps1
- default - The default psake task. In this case the task depends on the
AnalyzeandTesttasks to be performed first - Analyze - Run PowerShell Script Analyzer against
ServerInfo.ps1 - Test - Run all Pester tests in the repository
- Deploy - Invoke our PSDeploy script. You’ll notice that this task has a dependency on the
AnalyzeandTesttasks. This means that ourDeploytasks can never be run without the tasks’ dependencies completing successfully first. This ensures that we are only deploying code that has been tested first.
You can get as detailed as you need to with your psake tasks. You will likely create many more that map to the various operations regarding the
lifecycle of the repository. This in important as the primary way you interact with the repository going forward is to call build.ps1 with
the appropriate task name you would like to perform.
Create a PSDeploy script
Your PSDeploy script is the way you distribute your script to the outside world once it has passed all relevant testing initiated from your psake
script. Create a new script called ServerInfo.psdeploy.ps1 and copy the following contents into it. PSDeploy scripts use a simple DSL
which you can find more about here. The PSDeploy script below will just be copying our
ServerInfo.ps1 script to c:\temp. Not very useful I know, but imagine if you wanted to deploy the script to 1000 machines. It’s just a
matter of passing an array of destination shares in the To section. PSDeploy will take care of deploying the code to all 1000 endpoints for you.
ServerInfo.psdeploy.ps1
Deploy 'Deploy ServerInfo script' {
    By Filesystem {
        FromSource '.\ServerInfo.ps1'
        To 'C:\temp'
        Tagged Prod
    }
}
At the time of writing this post, PSDeploy supports the following deployment types:
- ARM - Execute an Azure deployment using ARM templates
- Artifactory - Deploy artifacts to an Artifactory endpoint
- CopyVMFile - Copy files to a VM via Hyper-V’s CopyVMFile cmdlet
- FileSystem - Copy files or folders using Copy-Item or Robocopy respectively
- FileSystemRemote - Copy files or folders using Copy-Item or Robocopy respectively using PSRemoting
- MkDocs - Deploy a MkDocs Site to a filesystem location as a static site or JSON object, or deploy the static site to GitHub Pages.
Create a README.md
Why create a README.md file? Your repository is starting to accumulate a handful of scripts and your colleges or future self will thank you
that you have taken the time to document what the purpose of this repository is and how to interact with it. The README.md is the perfect place
for that type of information.
README.md
## About
Author: Brandon Olin [[devblackops.io](https://devblackops.io)]
## Overview
An example of using the Release Pipeline Model with PowerShell-based tools. This repository hosts the ```ServerInfo.ps1```
script which will return system information about a given computer. This repository also includes associated tests and build
tasks for day to day operations and deployment of the script.
## Usage
A ```psake``` script has been created to manage the various operations related to testing and deployment of ```ServerInfo.ps1```
### Build Operations
* Test the script via Pester and Script Analyzer
```powershell
.\build.ps1
```
* Test the script with Pester only
```powershell
.\build.ps1 -Task Test
```
* Test the script with Script Analyzer only
```powershell
.\build.ps1 -Task Analyze
```
* Deploy the script via PSDeploy
```powershell
.\build.ps1 -Task Deploy
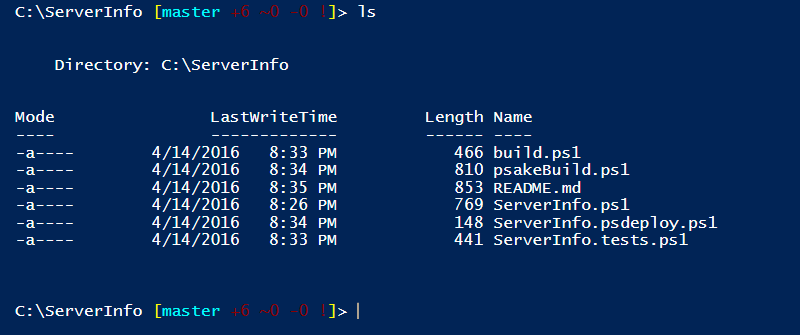
```Repository Overview
Now that we’ve created all the necessary objects in our repository, it should look similar to this:
Now we’re going to test out the various operations we can perform with build.ps1. Because we’ve haven’t wired up this repository to a true
build server like TFS or Jenkins, we’re going to simulate
that by manually executing our build.ps1 script. In a true Release Pipeline using Continuous Integration, your build server would be responsible
for executing the appropriate build task when you check in your code into your control system.
Looking at our psakeBuild.ps1 script above. We’ve defined the following tasks:
- Default
- Analyze
- Test
- Deploy
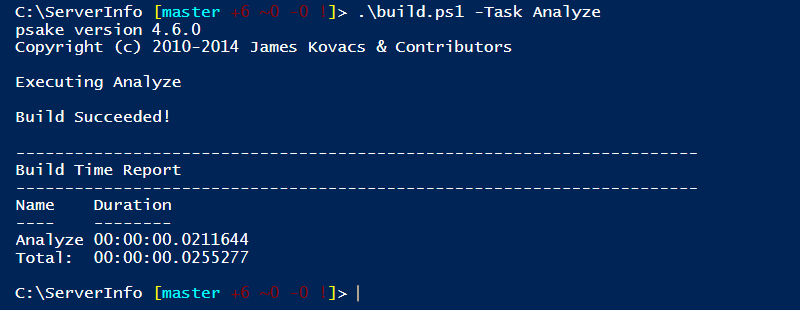
Analyze
Let’s manually run the Analyze task that will execute Script Analyzer.
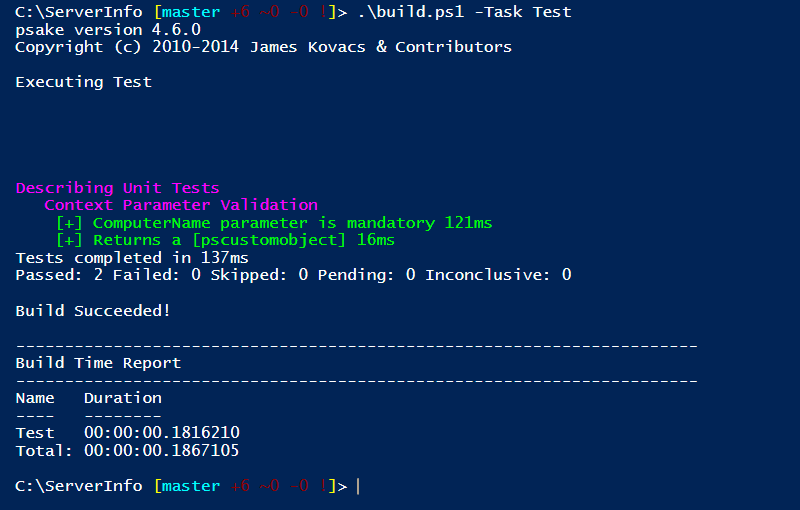
Test
Now let’s manually run the Test task that will invoke our Pester tests.
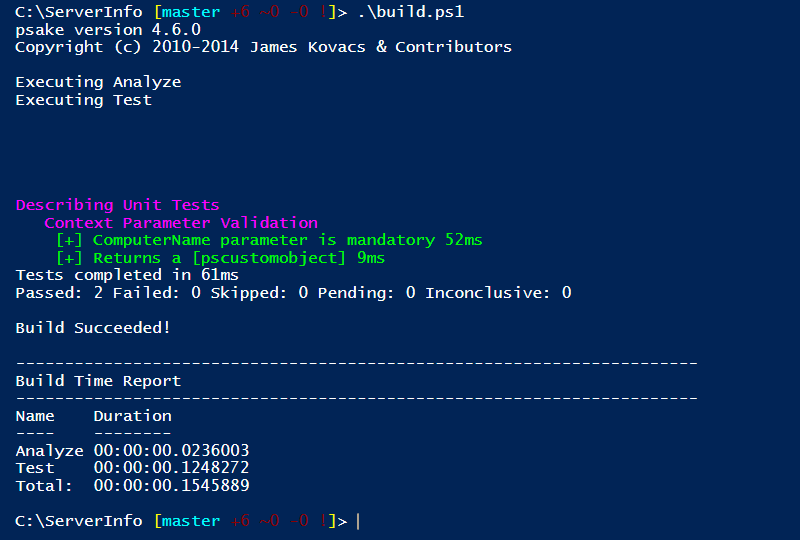
Default
Our Default task has dependencies on the Analyze and Test tasks completing successfully. Let’s kick off the default task to make
sure that happens.
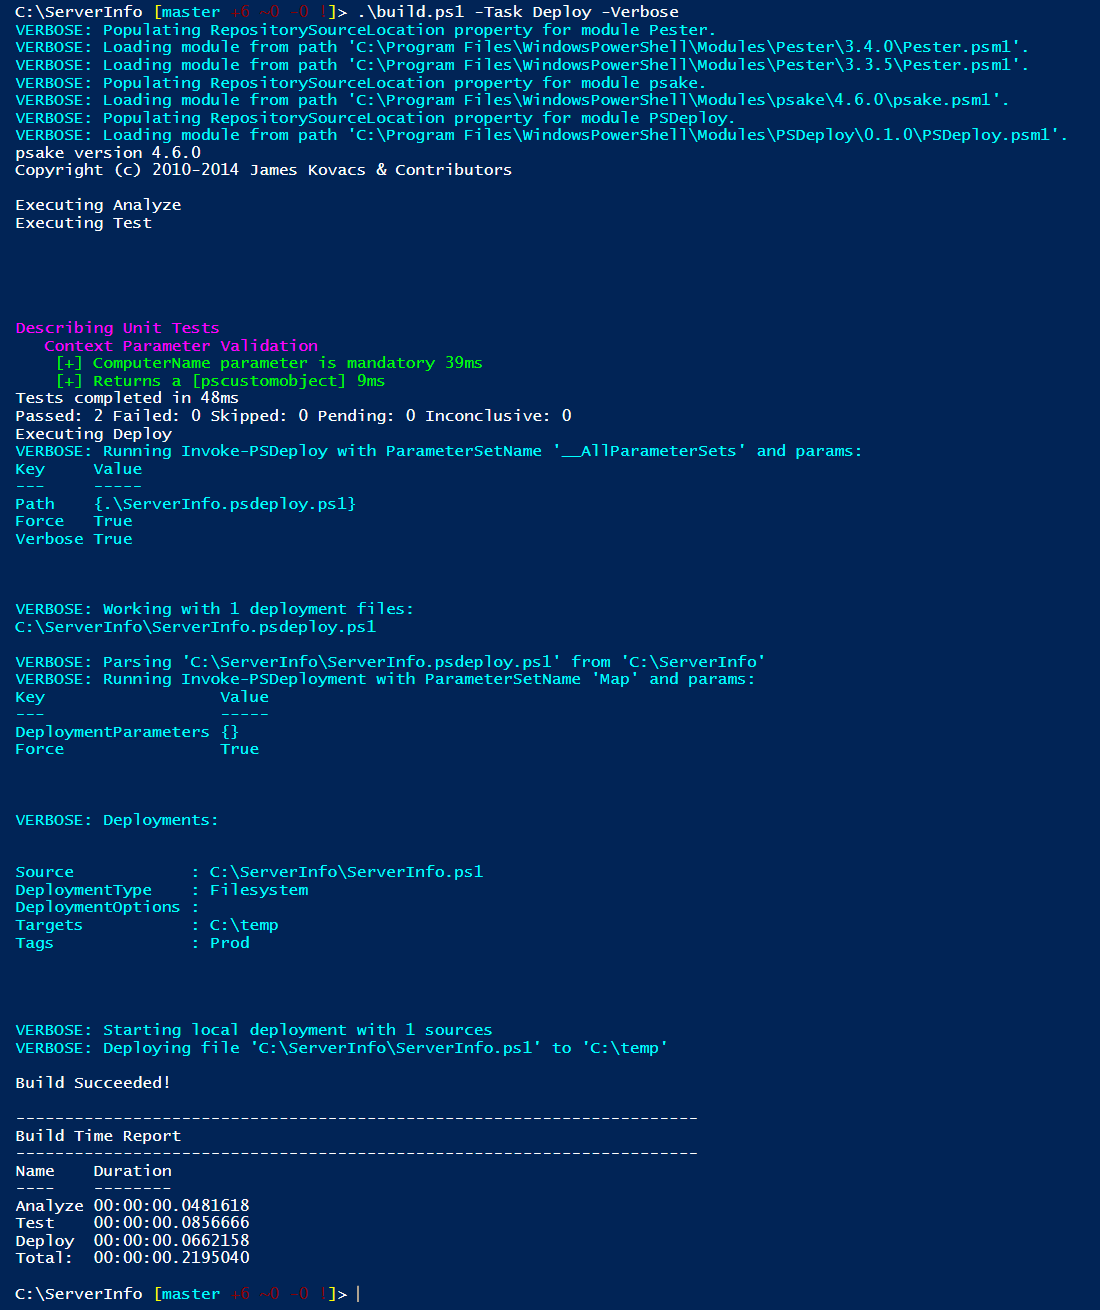
Deploy
The Deploy task also has dependencies on the Analyze and Test tasks completing before any code in the task in executed. This ensures
that only code that has passed our quality checks (such as they are) can be deployed. Let’s run our Deploy task and make sure that
ServerInfo.ps1 gets tested and our PSDeploy script is executed. I’m calling the build script with -Verbose so the PSDeploy output is shown.
Testing Failures
Our deploy worked on the first try! I don’t know about you, but I rarely get anything right on the first try. Let’s go back to our
ServerInfo.ps1 script and put some bad code in and re-run our build process. This error should be caught in our Pester or Script Analyzer tests
and trigger a failing build.
Put this code in ServerInfo.ps1
[cmdletbinding()]
#[OutputType([pscustomobject])] ### <--- We've commented out the output type

param(
    [parameter(mandatory)]
    [string[]]$ComputerName,

    [PSCredential]
    [System.Management.Automation.CredentialAttribute()]
    $Credential
)

process {
    foreach ($name in $ComputerName) {
        $cimSession = New-CimSession -ComputerName $name -Credential $Credential
        $compSys = Get-CimInstance -CimSession $cimSession -ClassName Win32_Computersystem
        Remove-CimSession $cimSession
        [pscustomobject]@{
            ComputerName = $compSys.Name
            PrimaryOwner = $compSys.PrimaryOwnerName
            RAM = $compSys.TotalPhysicalMemory
            Manufacturer = $compSys.Manufacturer
            Model = $compSys.Model
        }
    }
}
Execute the Deploy task and see if we catch the error.
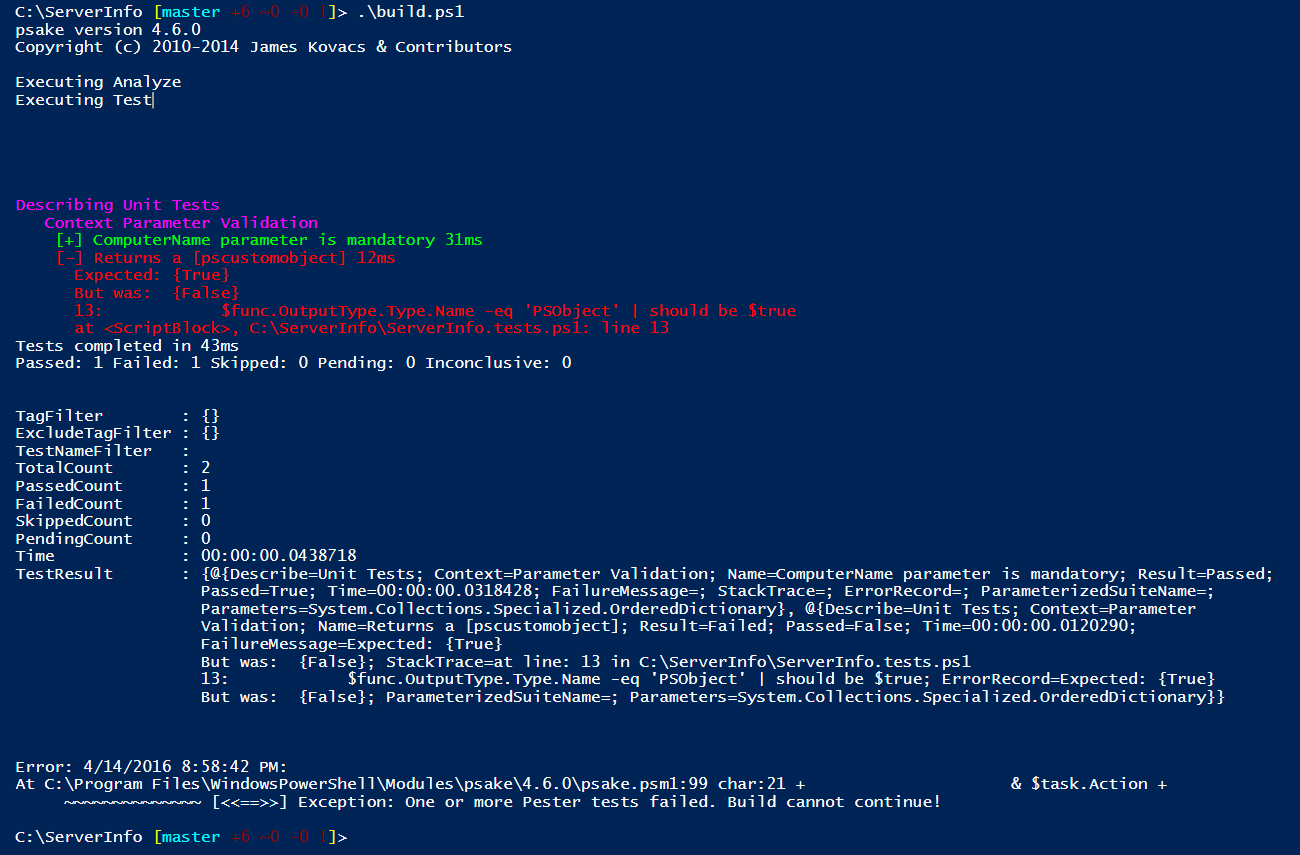
Notice that our Deploy task has failed on its’ dependencies and will NOT execute the deploy task. This just saved us from deploying bad
code into production.
Wrap up
As you further development your script and write Pester tests to test the script operates as you expect, you can now be confident that what you release into production will behave as you expect it to. Putting guard rails into your process in the form of automated tests and build procedures that require passing tests in order to proceed to the next stage will put you onto the happy path to releasing quality code at a faster pace.
The code in this post is also available on GitHub if you want to start with a working example for your projects.
Release Pipeline Example on GitHub→
There you have it. You now have a Release Pipeline implemented in pure PowerShell. I hope you found this post helpful and has given you some ideas on implementing this method in your environment.
Show your support